Week 2 of #10Weeksofcloudops
Design a three - tier architecture in AWS
Topis\Services Used -
- VPC - VPC is a Virtual Private Cloud which is built around the AWS resources. VPC is can also be defined as a network service which we use to establish boundaries between AWS resources.
- Subnets - Subnets is a portion of VPC which contains AWS services. It is a section of VPC where we can group the AWS resources based on security and operational needs/requirements. There are two types of Subnets - Public Subnet and Private Subnet.
- Public Subnet - It is a subnet which is internet facing. These subnets have internet connection. These subnets consists of resources that should be accessible by the public via internet.
- Private Subnet - It is a subnet which does not have internet connection. These subnets consists of resources that should not be accessible by internet but only through a private connection.
- NACL (Network Access Control List) - It is a virtual firewall which controls inbound and outbound traffic at subnet level. These are stateless packet filtering. By default NACL allows all inbound and outbound traffic, but can be modified by adding rules.
- Security Groups - It is a virtual firewall to control inbound and outbound traffic from any EC2 instances. These are for stateful packet filtering. By default it blocks all the inbound and allows all outbound traffic. They always follow previous decisions made for the incoming packets.
- Amazon Route 53 - It is a DNS service - DNS means Domain Name Service, which can translate any URL/Domain name to IP Address. This is like a phonebook for IP Addresses.
- Amazon Cloud Front - It is a Global content delivery network. Basically it routes the requests to closest region and low latency region.
.jpg)
A Three tier architecture basically consists of Presentation Tier (Client), Logic Tier (Server) and Data Tier (Database).

Creating the VPC - - Open the AWS management console.
- Search for "VPC" in the search option.
- Click on "Create VPC".
- In the VPC settings - Give a name to the VPC.
- And enter IPV4 CIDR Block - 10.32.0.0/16

Creating Subnets - - In the same page, navigate to subnets.
- Click "Create Subnet".
- In the page, select the VPC created.
- Provide a name for the subnet
- Provide CIDR for the subnet.


Similarly create 3 more subnets (2 private subnets and 1 public subnet).

Creating Internet Gateway - - Navigate to Internet Gateway.
- Click "Internet Gateway"
- Provide a name to the internet gateway and create the internet gateway.

Attaching the Internet Gateway to the VPC - - Select the VPC created.
- Click on the "Actions".
- Select "Attach to VPC".
- Select the VPC and click "Attach Internet Gateway".


Creating NAT Gateway -
- Navigate to NAT Gateways.
- Click "Create NAT Gateway".
- Provide the name.
- Select the Public subnet.
- Select "Public" for connectivity type.
- Click "Allocate Elastic IP".
- And click "Create NAT Gateway".

Create Route Tables - - Navigate to Route tables.
- Provide the name for the route table.
- Select the VPC.
- Click create route table.

Similarly, create route table for another subnet as well.

Configuring Internet Gateway, Subnets and NAT Gateway.
- Select the Route table.
- In the Actions, select "Edit Route".
- Select "Add Route",
- In the Destination, add 0.0.0.0/0.
- Select the Internet Gateway created.
- Click "Save Changes".
 Subnet associations.


Similarly, configure subnet association for private subnet as well.
Once the subnet associations are configured, the mapping can be viewed by Selecting the VPC -> Resource Map.

- Public Subnet - It is a subnet which is internet facing. These subnets have internet connection. These subnets consists of resources that should be accessible by the public via internet.
- Private Subnet - It is a subnet which does not have internet connection. These subnets consists of resources that should not be accessible by internet but only through a private connection.
- Amazon Route 53 - It is a DNS service - DNS means Domain Name Service, which can translate any URL/Domain name to IP Address. This is like a phonebook for IP Addresses.
- Amazon Cloud Front - It is a Global content delivery network. Basically it routes the requests to closest region and low latency region.
.jpg)

- Open the AWS management console.
- Search for "VPC" in the search option.
- Click on "Create VPC".
- In the VPC settings - Give a name to the VPC.
- And enter IPV4 CIDR Block - 10.32.0.0/16

- In the same page, navigate to subnets.
- Click "Create Subnet".
- In the page, select the VPC created.
- Provide a name for the subnet
- Provide CIDR for the subnet.


Similarly create 3 more subnets (2 private subnets and 1 public subnet).

- Navigate to Internet Gateway.
- Click "Internet Gateway"
- Provide a name to the internet gateway and create the internet gateway.

- Select the VPC created.
- Click on the "Actions".
- Select "Attach to VPC".
- Select the VPC and click "Attach Internet Gateway".


Creating NAT Gateway -
- Navigate to NAT Gateways.
- Click "Create NAT Gateway".
- Provide the name.
- Select the Public subnet.
- Select "Public" for connectivity type.
- Click "Allocate Elastic IP".
- And click "Create NAT Gateway".

Create Route Tables -
- Navigate to Route tables.
- Provide the name for the route table.
- Select the VPC.
- Click create route table.

Similarly, create route table for another subnet as well.

Configuring Internet Gateway, Subnets and NAT Gateway.
- Select the Route table.
- In the Actions, select "Edit Route".
- Select "Add Route",
- In the Destination, add 0.0.0.0/0.
- Select the Internet Gateway created.
- Click "Save Changes".


Similarly, configure subnet association for private subnet as well.

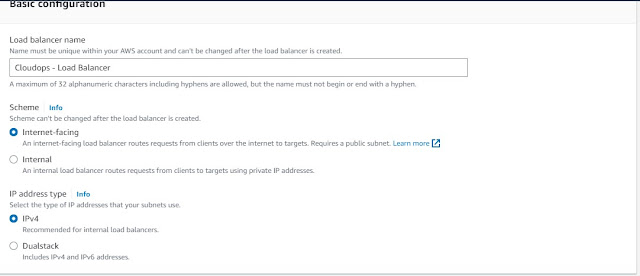
Creating the Load Balancer -
- In the search bar of the main page of AWS management console, search for EC2, navigate to Load balancer and select it.
- Click on "Create Load Balancer".
- Select "Application Load Balancer".
- Provide a name for the Load Balancer.
- In the scheme, select Internet Facing.
- Select IPV4 in IP address type.
In the Network mapping, Select the VPC created and the public subnet configured.

In the security Group, select the VPC that has been created and configured. Select the port number which has to be configured along with the protocol.


In the security Group, select the VPC that has been created and configured. Select the port number which has to be configured along with the protocol.


Click on the "Create Load Balancer", this creates the load balancer.
** Delete the Resources once created after the challenge is completed **

.jpg)
Comments
Post a Comment